Fruit Trees Pruning
• Why Prune ?
• Basic principles of pruning
• How to choose your pruning equipment
• When to prune ?
• Pruning shrubs
• Pruning hedges
• Fruit trees pruning
• Pruning shade trees
• Pruning trees
• Topiary art
• Pruning flowering plants
• Shape a pollarded tree
• Pruning of the Hydrangea Macrophylla
• Pruning of panicle producing Hydrangeas
• Pruning of the Lagerstroemia
• Pruning Roses
• Pruning Lavender
• Pruning of the Buddleia - Butterfly shrub
• Winter pruning of the climbers producing fruits
• Pruning of the Blackcurrant and Currant bushes
• Pruning of the Wisteria
Secateurs, Hedge Clippers, Hedge Trimmers, Saws, Pruning Loppers, Pruning Saws, Chainsaws...
The aim of pruning fruit trees is to help accelerate the production of fruit. It changes the flow of the sap and layout of the branches. For trees that produce fruit with pips, pruning mainly takes place during the dormant period (in winter when the trees have no leaves); it is known as dry pruning. For trees that produce fruit with stones, pruning when there is sap is better as it helps with the healing of the cuts; usually this is at the end of summer.
In growing periods, the rising sap (raw) helps the development of the upper branches to the detriment of the lower areas. The descending sap is full of sugar (enhanced). It acts to both improve the fruits and feed the tree. It is mainly found in the lower branches.
If the fruit tree is too vigorous, it will have a tendency just to grow new branches and not produce any fruit. Contrarily if the tree is covered in fruits, it will die from exhaustion, because the enhanced sap will feed the fruits but not the tree.
The essential in the pruning of a fruit tree, is finding the right balance between vigour and production,
in a way that fruit production is both optimal and sustainable over time.
On standard trees where the rooting is strong, the tree's boughs need to be open to develop fruit. The pruning is consequently moderate during the first few years of the tree's life to allow it to develop properly.
Aim to achieve denser vegetation on the outside of the tree compared to the centre, which receives less light.
Choose the thick branches that will have difficulty in producing fruit. Prune them just above a bud that is facing outwards. These branches will then split and encourage the weaker ones to grow.
During the first 2 or 3 years prune moderately and carry on the training work that the nurseryman began, and then prune every 5 to 10 years depending on the species.
The first proper fruiting should occur at the end of 5 to 10 years depending on the species.
See the creation of a bush shaped tree
For garden specific trees where rooting is weaker, pruning takes place every year with the aim of weakening the new spurs and buds on the upper side of the branch.
These small branches naturally tend to produce new wood at the expense of those spurs that face downwards or are horizontal, (better fed with the descending sap, enhanced sap) which assure the fruit production.
Prune annually to continue the tree shaping that the nurseryman started and to encourage fruit. The first fruiting should occur from the second or third year onwards.
See the creation of an apple cordon
See the creation of a double U shaped palmette
In a word, always try to keep the branches and the tree well balanced:
- A vigorous tree should not be over pruned in an attempt to subdue it
- A sluggish tree or one covered with fruits must be pruned more harshly to get its vegetation growing and to reinvigorate it.
The apple tree is one of the fruit trees that best lends itself to be grown in this open bush shape.
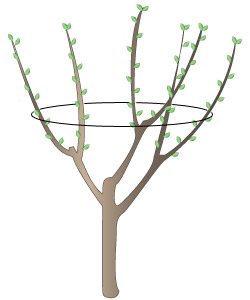
The bush shape is not often sold by nurseries. With a few secateur cuts and a little patience you should after 3 to 4 years arrive at this ideal shape for the small garden. The creating of a bush involves putting a framework around the tree to which the trained branches can be attached.
This supporting structure can be temporary and consist off a few wooden hoops made out of a flexible wood such as hazelnut or more permanent using a metal structure. These hoops are spaced about 50 cm apart and held in place by pegs or supports embedded in the ground.

Year 1
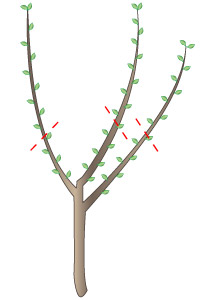
In the year of planting prune back the stem (a Maiden whip with no laterals) to about 30cm above three or four spurs, so that branching out is encouraged. As these spurs grow, attach them at first diagonally and then horizontally along the framework to train them.
Year 2
The following year keep two spurs on each branch so that you end up with six or eight structural branches that can be grown and used to produce fruit. As the branches grow, continue attaching them to the framework.
If the variety or grafted specimen is very vigorous, you can double up the branches to achieve well-developed bushes with between twelve and sixteen branches.
Year 3
In the following years, these structural branches should all be equally vigorous. Grow them simultaneously by cutting them above an outward facing side spur making sure to keep them all the same length.
Do not increase each one's length by more than twenty centimetres to encourage side shoots which are fruit bearing.
Creating a single apple tree cordon
This is traditionally the apple tree found in the small garden; it is simple, takes up little space and is easy to create. You can gain some time by buying a tree already formed from a nursery. You can also easily create the shape by starting with a maiden whip (with no laterals), making sure that this is grafted on to a dwarf rootstock (smaller root system).
The best way of training the tree is to use a frame to give support. This consists simply of a metal wire stretched between two posts at a height of between 40 to 80cm.
Training the branches
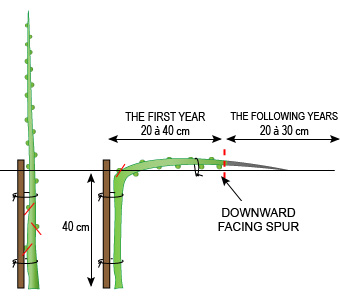
When planting the tree carefully bend it into an arch and attach it to the metal wire by means of a 10cm loop. Cut off any shoots on the vertical part. Prune the horizontal part attached to the wire just after a downward facing spur between 20 and 40cm from the end depending on the vigour of the specimen. The new fruit bearing branches will come from these lateral shoots. Any upward or downward facing buds should be removed to encourage fruiting. This can simply be done with your fingernail.
In the following years, the cordon should grow 20 to 30cm per year (depending on its vigour) and end up with three to five fruit bearing branches. Always reduce its length by cutting just after a downward facing spur.
It is a good idea to plant several trees in line along the same wire. It is aesthetically pleasing and allows you to grow different varieties and increase cropping. The distance between trees should be between 2 and 4 metres depending on their growth habits. You could plant a line along the side of the vegetable patch for example.
The cordon can easily be doubled by having a branch fixed to the wire on both the left and right hand sides. To do this cut the maiden whip 5cm below the wire making sure to have two upward facing shots remaining.
The subsequent branches can then be trained on either side along the wire.
Creating a U shaped palmette (espalier - like)
This form of palmette is without doubt the best shaped for the amateur gardener. Its maintenance and production of fruit are simplified. It is perfectly balanced being made from two successive branchings off.
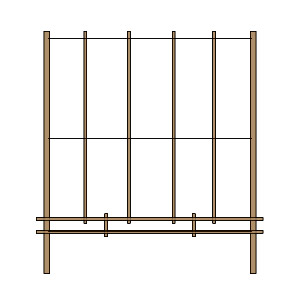
It is certainly easier to buy a specimen that has already been trained from a nursery but a few carefully positioned cuts with the secateurs and a degree of patience will allow you to quickly create this shape (3 to 4 years).
To get a better shape use a framework. Stretch two or three metal wires spaced about 50cm apart between two posts.
Then on this support fix four vertical slats about 30cm apart.
Put two horizontal struts in place between the posts, the first along the bottom wire about 20 to 30cm above the ground and the second about 10cm above this.
Connect the two slats together by means of two small pieces of wood so making three rectangles at the base.
You now have the shape for your future palmette.

The first year
In the first year cut the stem (Maiden whip with no laterals) to about 20cm high ensuring that there are spurs on both the left and right sides.
As the spurs grow attach them to the frame by bending them and train them to make the first U shape, horizontally along the bottom slat and then upright along the small pieces of wood that separate two outside rectangles.
Depending on the vigour of the variety, this can take up to two years.
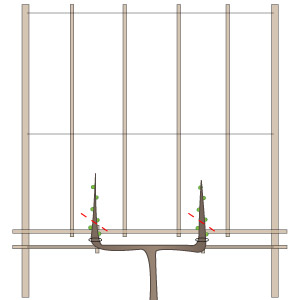
Training the branches
The next year keep two lateral branches on each length (four branches) and carry out the same operation of training the branches, by bending them at about 12 cm from their joint with the stem.
The four branches thus created should all be equally vigorous because they are all at the same level.
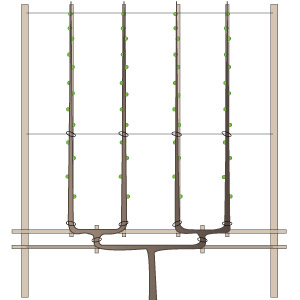
U shaped palmette
In the following years, simultaneously train the branches by cutting them all to the same length above a side shoot.
This pruning should be done at about a length of 20cm on each one and will encourage the formation of lateral fruit bearing branches.


